ServiceNow for IT Services
Announcements
- If you need training for ServiceNow, please speak with your supervisor and email the Service Now Admins.
ServiceNow is the service management platform used by the IT Service Desk to track IT-related incidents and requests reported by UMass Boston faculty, staff, and students. Access to ServiceNow is currently only available to IT staff.
ServiceNow Help
- Managing intake: intake creates a record of each call or email to the IT Service Desk.
- Creating incidents via email: every message sent to itservicedesk@umb.edu creates a record in ServiceNow.
- Creating incidents manually: all that's needed is a caller, a service & a symptom to log an incident.
- Managing incidents: incidents are how we measure the health of a service.
- Creating and resolving incidents at once (See Creating incidents manually)
- Assigning or re-routing incidents: new incidents can be redirected to the appropriate service before assignment.
- Contacting clients via comments: email can be sent to clients from within ServiceNow.
- Resolving incidents: when work is completed, ServiceNow notifies the caller and asks for confirmation to close the incident.
- Managing tasks: tasks are how IT staff ask each other for help in resolving an incident.
- Creating tasks: when an incident requires additional work from another IT group, a task associated to the incident can be created.
- Assigning tasks: tasks are assigned much like incidents.
- Closing tasks: unlike incidents, tasks are closed without sending a confirmation email to the caller.
- Managing assignment groups: service managers determine who are notified of new incidents for their service.
- Searching for tickets (or groups of tickets)
Managing intake
Creating incidents via email
- Send an email to itservicedesk@umb.edu (or BCC itservicedesk@umb.edu on an email chain); Never CC itservicedesk@umb.edu on an email.
- Sign in to ServiceNow using your campus email username (without @umb.edu) and password.
- From the application navigator, select intake → active intakes.
- Find the short description that matches the subject line of the email and click on the intake number.
- On the first entry at the bottom of the activity log (under the notes tab), click show email details.
- Review the email.
- Update the caller, affected user and location as necessary.
- Determine the most appropriate service and symptom for this incident.
- Answer any questions or prompts in the description.
- If changing the service or symptom, first delete the short description and description to ensure they update correctly. Any notes worth saving in the description can be cut and pasted into work notes.
- Select the most appropriate impact & urgency.
- To create an incident for the previewed assignment group:
- Click next.
- To request additional information from the caller, compose a brief email in additional comments (under the notes tab) and click post.
- Add yourself to the watch list to be notified when the caller replies.
- If the incident has already been resolved:
- Click resolve.
- Enter an explanation of the resolution to be reviewed by the caller in the resolution notes.
- Select the most appropriate close code.
Creating incidents manually
- Sign in to ServiceNow using your campus email username (without @umb.edu) and password.
- From the application menu, select intake → create intake.
- Search for the caller by entering a name, email, HR or wiser ID.
- Search for the affected user by name, email, HR or wiser ID, if different from caller.
- The building, floor and room are populated from the telecom directory. To specify a different location, update the fields manually. To update the person’s default office location, contact telecom user services.
- If the caller isn’t found, check caller not found and enter the caller’s information manually.
- Search for the service by entering a service name or a wildcard (*) and keyword.
- Search for available symptoms by entering a double wildcard (**).
- Answer any questions or prompts in the description.
- If changing the service or symptom, first delete the short description and description to ensure they update correctly. Any notes worth saving in the description can be cut and pasted into work notes.
- Select the most appropriate impact & urgency.
- To create an incident for the previewed assignment group:
- Click next.
- To request additional information from the caller, compose a brief email in additional comments (under the notes tab) and click post.
- Add yourself to the watch list to be notified when the caller replies.
- If the incident has already been resolved:
- Click resolve.
- Enter an explanation of the resolution to be reviewed by the caller in the resolution notes.
- Select the most appropriate close code.
Managing incidents
Assigning or re-routing incidents
- Sign in to ServiceNow using your campus email username (without @umb.edu) and password.
- From the application menu, select my work → my groups work.
- Open an incident record by clicking on the incident number (or the underlined value in the first column for that record).
- Review the description and any relevant activity (under the notes tab).
- If the service or symptom are incorrect:
- Click route.
- Click misrouted (only available for ‘new’ incidents).
- Select a service & symptom.
- Enter an explanation for how you identified the correct service & symptom under misrouted reason.
- Click route.
- Update the short description as needed.
- Click update.
- To take responsibility for the incident, enter your name under assigned to and click save or update.
Contacting clients via comments
- Open an incident record (via my work → my work or my groups work).
- Scroll down to the notes tab.
- Compose a brief email in the additional comments field and click post.
- If the additional comments field isn’t displayed, check the box next to additional comments beneath work notes.
- An email will be sent to the caller and added to the activity log.
- When the caller replies, the message will be added as a comment on the ticket and a notification will be sent to the assignee.
Resolving incidents
- Open an incident record (via my work → my work).
- Click resolve incident.
- Select the most appropriate resolution code.
- Enter an explanation of the resolution to be reviewed by the caller in the resolution notes.
- Click resolve.
- An email will be sent to the caller asking them to either close the incident or re-open it. If they do not reply in 10 days, the incident will be closed.
Managing tasks
Creating tasks
- Open an incident record (via my work → my work).
- Click route.
- Select an assignment group
- Update the short description and description to something meaningful for the assignment group.
- Click route.
- A new task will be created and listed at the bottom of the incident record. The task will also appear in the assignment groups work queue and an email notification will be sent. An email will also be sent when the task is closed.
Assigning tasks
- From the application menu, select my work → my Groups work.
- Open a task record by clicking on the task number (or the underlined value in the first column for that record).
- Review the description and any relevant activity (under the notes tab).
- To take responsibility for the incident, enter your name under assigned to and click save/update.
Closing tasks
- Open a task record (via my work → my work).
- Enter information about the task completion in work notes and click post.
- Change the state to ‘closed.’
- Click save/update.
Managing groups
Adding members to an assignment group
- From the application menu, select my work → groups I manage → manage group membership.
- Open a group record by clicking on the underlined value in the first column of the record.
- Click on the group members tab
- Click edit
- Search for the member to add in the box to the left.
- Click on the right chevron (›) button to add the highlighted member to the left.
- Click save.
Removing members from an assignment group
- From the application menu, select my work → groups I manage → manage group membership.
- Open a group record by clicking on the underlined value in the first column of the record.
- Click on the group members tab
- Click edit
- Search for the member to remove in the box on the right.
- Click the left chevron (‹) button to remove the highlighted member on the right.
- Click save.
Searching for tickets (or groups of tickets)
Searching for tickets
To quickly search for a specific incident, click the magnifying glass next to your name in the blue bar at the top. Type in the full incident number (e.g. INC0012955) for an exact match, which will display the found incident for you, or part of the incident number (e.g. 12955) for a list of matches by category. (The second way of searching is not extremely reliable. 12955 would find a match, but 2955 would not.)
To find an incident by something other than incident number, or to find a set of incidents, such as everything from a particular caller, follow these steps:
- Click My Work or My Groups Work to begin in list view.
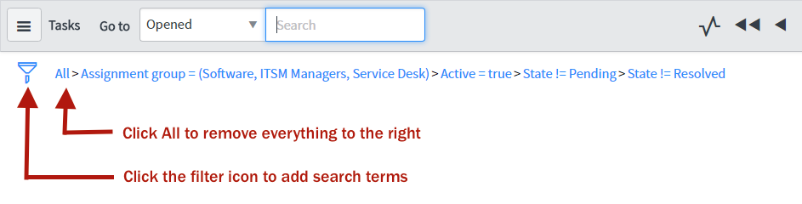
- Click All (see below) to remove all search terms and show all incidents, tasks, and intakes.
- Click the Filter icon to begin adding new search terms.
- Click the "Choose field" drop down menu and select the field you want to search on. For names, select Caller.
- Choose your search operator from choices like "equals," begins with," "is not empty," etc., and put in the text you want to search for.
- Add more search terms to narrow your search (e.g. all callers named Jones in Wheatley Hall) using AND/OR buttons. Remove unwanted search terms by clicking the X at the far right.
- Click Run to finish and display your results.
Saving and reusing searches
- Follow the instructions above to develop a search you might re-use. Instead of clicking Run, click Save and give the search a name.
- Next time you are in list view (e.g. My Work) click the "hamburger menu" (three horizontal lines) and select Filter, then your saved search.